


For those of you out there who enjoy pinning self-view during Zoom seminar. We see you. We do it, too.
Now that I venture out-of-doors at most twice a week, putting on makeup feels like a vestigial ritual of a happier, bygone time. I choose to do it anyway, because I feel that the process of painting my face every morning brings me a sense of calm and collectedness I need to confront each new day. However, as with other aspects of my life, I’ve found it necessary to tailor my daily makeup routine a bit to be more suitable for the demands of what constitutes the “new normal”: namely, hours of back-to-back video calls on our beloved teleconferencing platform, Zoom.
Here are some of the tips and tricks for Zoom makeup that I’ve picked up from playing around these past few months. Whether you’re a fellow die-hard makeup enthusiast or just someone interested in experimenting with their look, I hope some of these can be helpful for you!
Clean, radiant skin WITHOUT using “Touch up my appearance”: a step-by-step.
One of my greatest insecurities, both in-person and online, is how my skin texture looks without base makeup. I frequently experience a fair amount of acne, which I used to cover up with a full face of foundation every day back on campus. These days, my skin is doing much better than before, but I still have to deal with some acne scarring and a few pesky breakouts here and there. Fortunately, one benefit of being on Zoom is that discoloration and skin texture are generally much less visible on video. Unless you’ve got a 4K HD Twitch-streaming webcam, the low resolution of your built-in FaceTime camera has somewhat of a blurring effect on your skin, even without the “Touch up my appearance” option enabled. As such, I’ve been getting away with a foundation-free, lower-coverage base routine that I want to share with you today!
After prepping my skin with moisturizer and SPF, I’ll do a quick assessment of my skin each morning — I find it’s important to tweak your routine to suit the conditions of your skin on that given day.
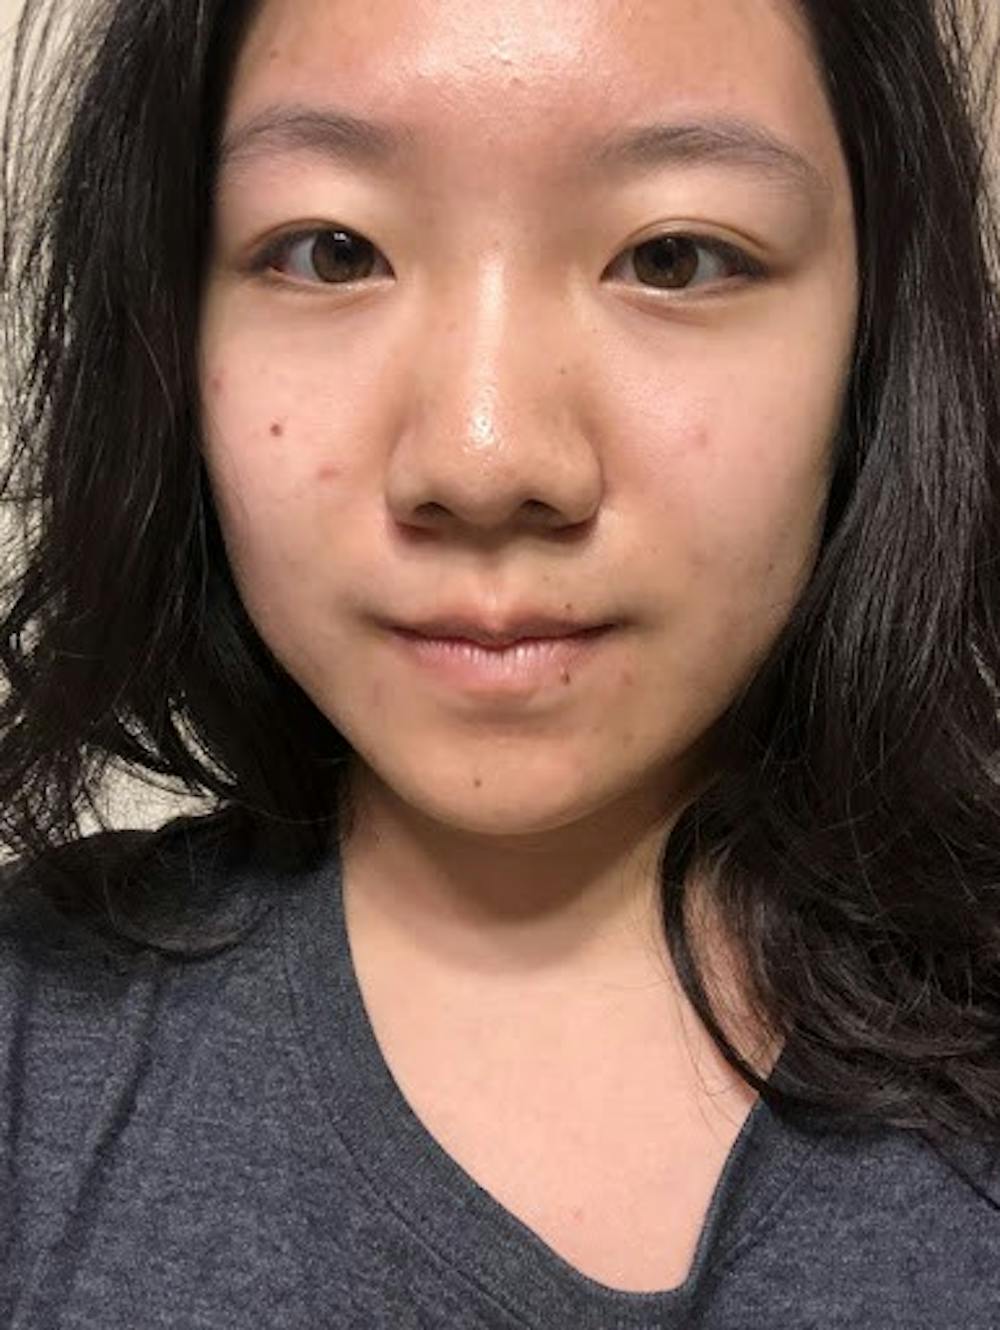
My skin texture without any makeup on. Taken with an iPhone X front-facing camera (yuck).
Megan Pan / The Daily Princetonian

If I see any particularly noticeable breakouts, I’ll go in with some pinpoint concealing: that is, spot-treating a blemish by stippling product on top and blending, instead of covering a wide swatch of skin. I like to use a medium-coverage product like the Maybelline Fit Me Concealer in either exactly my skin tone or a little darker, which helps to visually “push” the raised texture back in place and mask the appearance of the bump. Apply a small amount of product directly on top of the spot, let it sit for a minute or so, and then use your fingers to smooth out the edges.
In the process of spot-treating, before blending everything out.
Megan Pan / The Daily Princetonian
You can keep going with your concealer to provide any more coverage as you see fit; I like to put a little bit on my undereye circles, on the redness on my cheeks, and around my brows and lip line to clean and define them. Keep in mind that you likely need much less product than you think you would! Again, the camera won’t pick up nearly as much as you see in your mirror, so don’t be afraid to go in with a lighter hand than usual. As soon as you’ve finished, make sure to set the places you concealed with powder to lock the product in place. Using either a loose or a pressed setting powder (my favorite these days is the Becca Hydra-Mist Set & Refresh Powder), gently tap the powder using a fluffy brush or a puff onto the concealed areas, making sure not to disrupt the product underneath.

After blending the concealer out, before setting with powder.
Megan Pan / The Daily Princetonian

Once you’ve got your base all set, you can follow up with some cheek products to bring some color and definition back into the skin. These days I’ve been loving the look of a minimal, fresh face with just a bit of blush on the cheeks, without any intense contouring. Liquid and cream blushes are a particular soft spot of mine because I love how buildable they are on top of your bare skin. Milk Makeup’s Lip + Cheek in Werk is a beautiful dusty rose with a satin finish, perfect to pat onto the high points of your cheeks or swipe onto lips and eyes for a natural, color-coordinated look — make sure you use any cream products before setting with powder though! When you’re happy with your look, spritz some setting spray all over to fix everything in place, and you’re ready to face the world (or just your morning lecture).
I am literally a different person with and without eyebrows: a quick brow + eyes routine.
While ordinarily, I’m the type of person who loves switching up my makeup to suit my day-to-day mood, sometimes you just need a tried and true regimen that you can fall back on if you’re ever in a rush. On days when I sleep through my alarm and wake up ten minutes before class, I adapt my makeup application to prioritize the eyes—specifically, putting on my eyebrows and adding some dimension to my eyes to give the impression that I am alert, awake, and entirely well-rested.
Eyebrows are really important (well, at least to me) because they serve to frame the rest of your face. Especially for someone like me with super sparse brows, it sometimes takes a little bit of extra help in order to get them where you want them to be. The quickest way to groom your brows in a hurry is to brush through them with a little bit of brow gel. A tinted gel is great for depositing color and giving the impression of a thicker eyebrow, but if you’re already blessed with full, bushy brows, you might prefer a clear gel just to set them in place (you could also try out the soap brows technique that’s been trending on Instagram for a fluffy, feathered brow look!).
However, since I like to have some more control over the structure of my brows, I’ll usually opt for a brow pencil instead. I’ll fill in my brows according to their natural shape, starting from the arch to the tip and lightening up more for the front. This process doesn’t have to be incredibly precise either, since again, the camera isn’t going to pick up each individual brow hair, so focus on creating the overall shape of the brow to your liking.
After that, I’ll spruce up the eyes with either a swipe of eyeshadow or liner and some mascara. With regard to shadow, going in with a neutral, contour tone is always good for adding depth to the eyes, but these days I’ll often play around with bolder colors, too. Currently, I’ve been really enjoying the Laura Mercier Caviar Stick Eye Shadow in Amethyst, a soft shimmery purple whose cooler mauve tones beautifully complement my brown eyes. As for liner, there’s no need to go for a full-on cat-eye wing; just filling in the upper lash line, making sure to really get in between the lashes, is enough to give the impression of an open, defined eye.
Last but not least, I always make sure to finish up with a hearty coat of mascara. Lately, I’ve been obsessed with Beauty Bakerie’s Eyelash Icing Waterproof Mascara — ink-black, SO lengthening, and clump-free. Feel free to experiment with different combinations of eye products to see what kind of look you like the best!

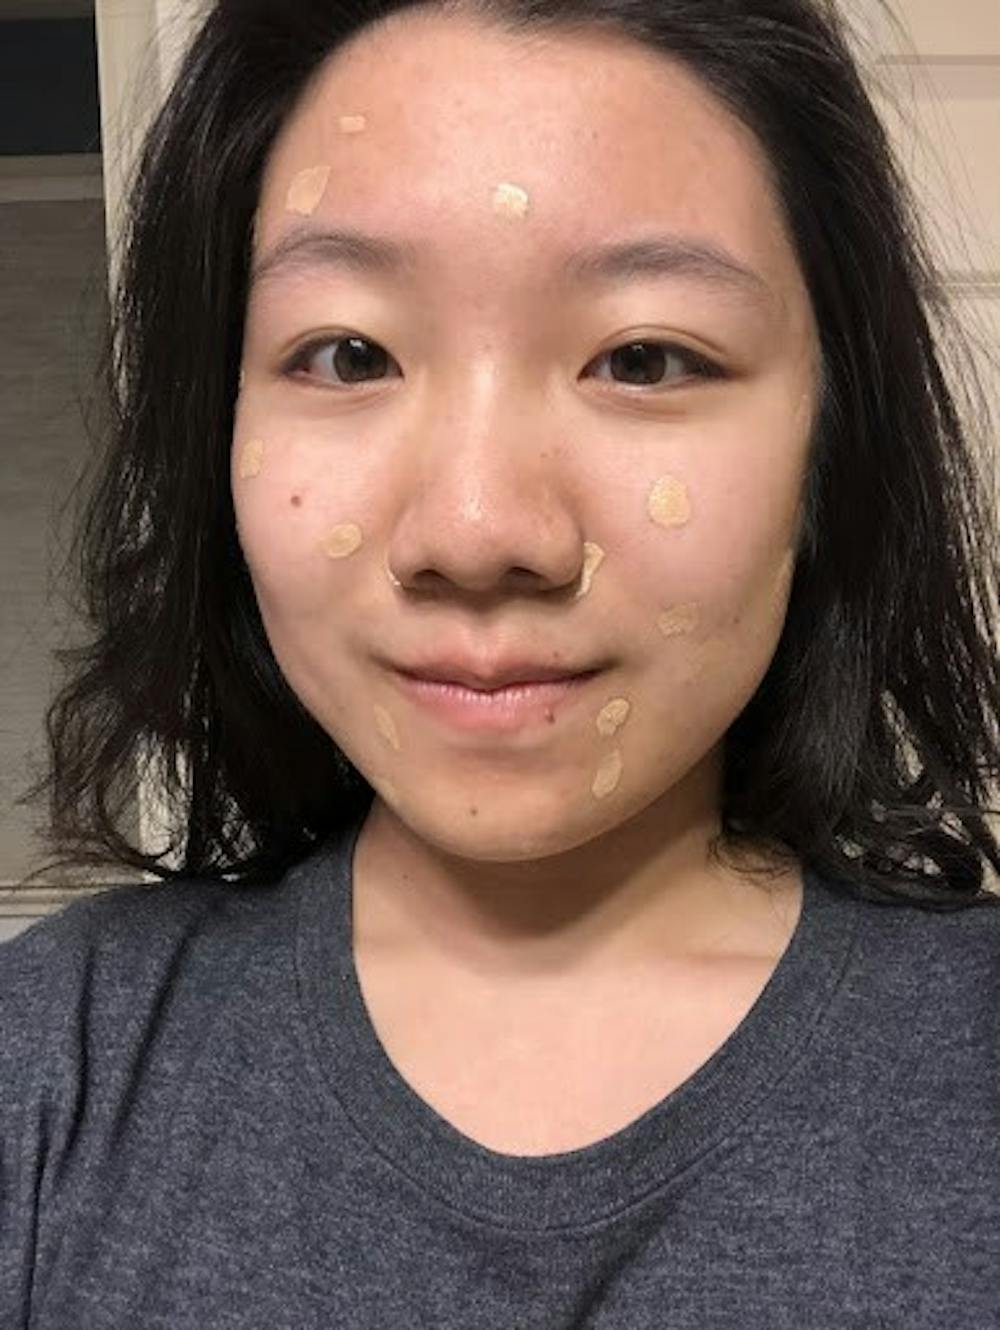
My ten-minute natural face. In addition to concealer, I’m wearing some eyeliner, mascara, cream blush, and lip tint. Oh, and I penciled my brows on, too.
Megan Pan / The Daily Princetonian
Lip gloss is baller, but I’m tired of getting stains all over my mug: easy lip alternatives.
Maybe this is just a me problem, but whenever I decide to go for a glossy lip for the day, I basically have to resign myself to the fact that I’ll be leaving sticky residue on every surface with which my lips come into contact: utensils, water bottles, and my dog Hugo. Because of this, I often choose to swap my high-shine glosses for options that are a little more transfer-proof and/or long-wearing.
Matte liquid lipsticks are usually a great option because they tend to feel weightless on the lips and have a fairly strong staying power; my go-to these days is the Nars Powermatte Lip Pigment in American Woman, a chestnut rose that works as a perfect MLBB (my lips but better) shade for my skin tone.
Another good alternative would be a lip stain: these generally tend to be rather long-lasting, plus they feel quite comfortable on the lips — ideal for people whose lips are perhaps a little dry or cracked. For a more subtle look, I would opt for the slightly rose-scented Benetint Cheek & Lip Stain (an excellent multitasker!), or for a bright pop of color, I would recommend swiping on the Etude House Dear Darling Water Gel Tint — a little goes a long way!
Finally, if you’re happy with your natural lip tone and are just looking to give it some TLC, a nourishing lip balm would be the thing for you. Granted, some lip balms can be somewhat tackier than others, but if you can find one that’s light or fast-absorbing (or if you’re okay with a little bit of residue), you’ll be good to go.
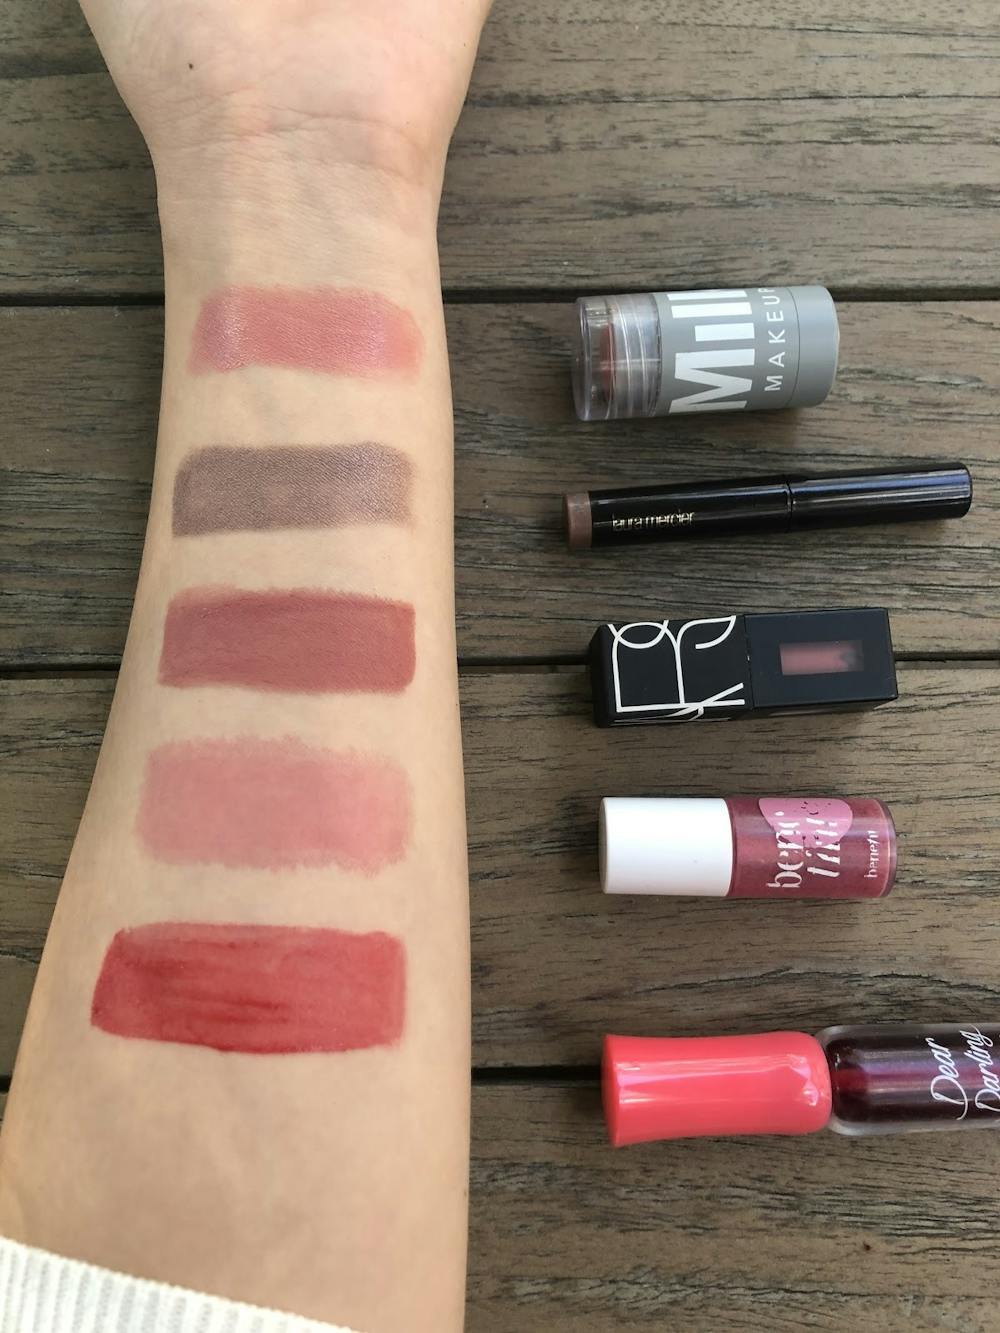
Swatches of all the color products mentioned above. From top to bottom: Milk Lip + Cheek, Laura Mercier Caviar Stick Eye Shadow, Nars Powermatte Lip Pigment, Benetint Cheek + Lip Stain, Etude House Dear Darling Water Gel Tint.
Megan Pan / The Daily Princetonian
A more technical note: consider your lighting.
Especially when applying your base makeup, you’ll want to think about how it’ll look on video given your specific camera and lighting setup. What would ordinarily look fine in everyday life might make you look overly washed-out, depending on what you have as your main source of light. While you’re doing your makeup, try periodically checking your reflection using the Zoom camera (accessible out-of-meetings in Settings) to make sure you’re adjusting your colors as necessary.
Another way to easily address this issue is to actually adjust your lighting! I recommend using natural light whenever possible (e.g. sitting outside, beside a window, etc.), since I think it allows you to most closely mimic the type of makeup that will look good in real life. If you sit in front of a window, you can also raise or lower the shade throughout the day to add or subtract light to your liking. Plus it lets you get that ~lit-from-within~ sort of healthy glow (just ask my editor, Paige — every time she sees me on Zoom, she comments on my ethereal complexion, when in reality it is just the sun. Ily Paige).
Another technical note: consider your color balance.
I’m no camera expert, but something I’ve noticed that you likely have, too, is that things will look different on camera depending on what colors are next to each other (and their brightness, and their saturation, etc.). If you’ve ever taken a selfie using your phone camera, you’ll notice that your skin will look much different with different lightings, backgrounds, and so forth. This is something you can keep in mind when doing makeup, too! I’m no color theorist either, but for example, just from my personal observations, I’ve found that using products with warmer undertones, such as pinkish eyeshadow or orangey bronzers, can sometimes run the risk of accentuating the redness of my skin on camera, so I often have to take precautions against that. The clothes you’re wearing can also bring out and emphasize certain tones in your skin, makeup, and even hair, so it might be worth trying out different color combinations to see what colors are most flattering for you.

Two screenshots taken from Zoom meetings at different times of day. You can see how my skin tone looks a lot lighter in the top photo, and it also has a slightly more luminous quality than that of the bottom photo. It should also be noted that I am not wearing any makeup in either photo, yet the Zoom video camera still manages to blur the majority of my skin’s imperfections.
Megan Pan / The Daily Princetonian
That’s all I have to share for now! Keep in mind, all of these are just personal suggestions; they are by no means the final say on how you should (or shouldn’t) be doing your makeup. Go with what makes you the most confident and comfortable, whether that means a full face of makeup each day, or no makeup at all. At the end of the day, it’s best not to worry too much about how you present yourself on Zoom; I can almost guarantee you that other people are also too busy pinning their own videos to pay too much attention. Bye for now — in the meantime, stay hydrated, wear your sunscreen, and take care.
Read More

Undergraduate cyclist struck by University employee sues for damages
Haeon LeeThe student, who was seriously injured, is suing the University, the employee, and the owner of the vehicle for damages.
The student, who was seriously injured, is suing the University, the employee, and the owner of the vehicle for damages.

Former Princeton standout Xaivian Lee signs with the Cleveland Cavaliers on Exhibit 10 contract
Jordan HalagaoFormer Princeton men’s basketball player Xaivian Lee signed an Exhibit 10 contract with the Cleveland Cavaliers to participate in training camp and Summer League.
Former men’s basketball player Xaivian Lee signed an Exhibit 10 contract with the Cleveland Cavaliers to participate in training camp and Summer League.

Princeton names eight new trustees, increasing total trustee count by three
Nico David-FoxThe board now has 40 members, the maximum number permitted under its bylaws.
The board now has 40 members, the maximum number permitted under its bylaws.